

How To Insert A Drawing In Google Slides
When working with presentations, formatting a shape is a primal skill to have as it allows you to employ shapes creatively! However, when it comes to Google Slides, formatting shapes is not quite as straightforward as you may expect it to exist.
Here's how you lot can format shapes in Google Slides –
- Select the shape by clicking on it.
- Right-click on the Shape, and choose "Format Options".
- A new window pane volition open on the correct with diverse options to format the selected shape.
The above method volition assist you access most shape formatting options. But, information technology won't really provide you with all the various shape formatting options available in Google Slides.
So, in this article, I'll share with you everything yous need to know on how to format shapes in Google Slides. Plus, watch out for the ninja tips throughout the article!
Adding Shapes in Google Slides
For making a presentation that looks professional person and highly-seasoned, knowing how to add various shapes on your presentation is always very useful.
Hither'southward a detailed stride-by-step process to adding shapes in Google Slides –
Step 1 – Open the specific slide in Google Slides
For calculation a shape to a slide, commencement, open Google Slides.
Yous tin can open the respective Google Slides presentation from your Google Drive or click here and log in to your Google account.
Step ii – Insert a Shape on the Slide
To insert a shape on Google Slides, go to the slide on which yous want to insert the shape.
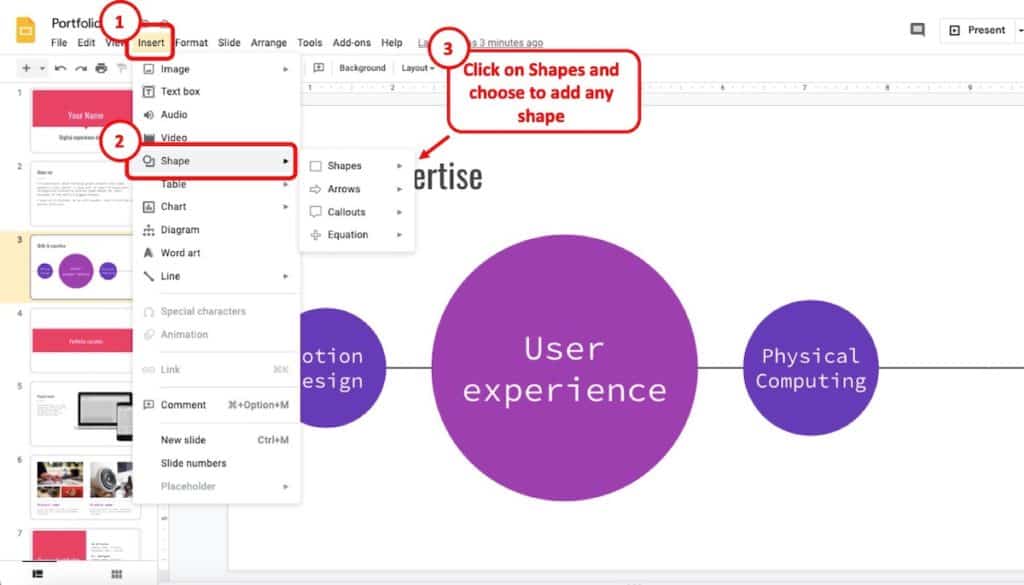
Then, click on the "Insert" menu. A dropdown menu will announced. From the dropdown menu, click on "Shape". Another menu will appear on the right. Cull the type of shape yous want to insert from this carte du jour.
If you want to insert a standard shape such as a rectangle or a circle, then click on "Shapes" and choose the advisable shape.
Another method of inserting shape is directly from the toolbar.
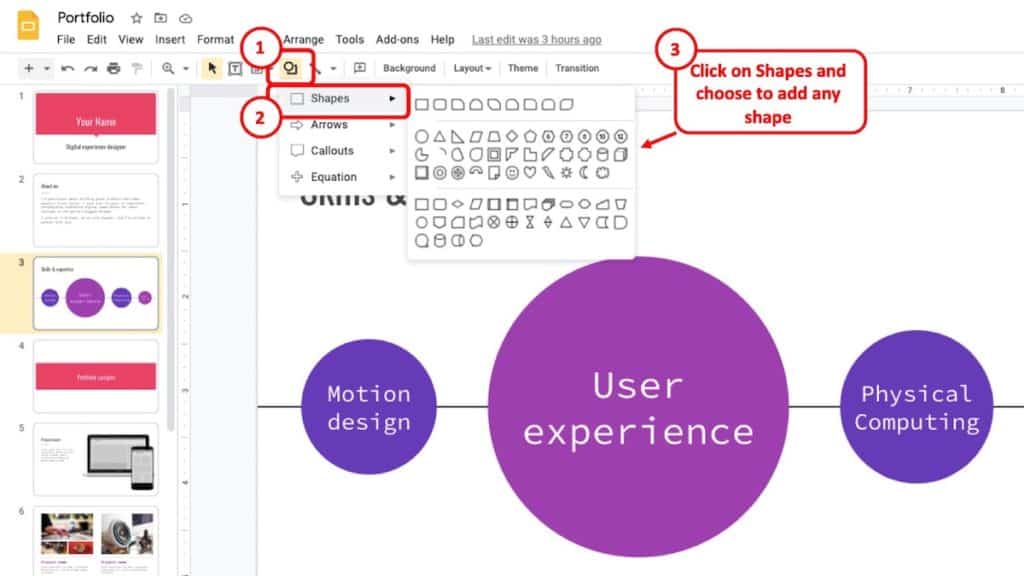
After opening the slide on which you want to insert a shape, go to Slides, yous will see an option called "Shapes" at the top right corner of the screen. Information technology may be hard to locate just y'all identify information technology with its icon. There should be a square and a circle drawn on the push (as indicated on the paradigm above). Click on it.
After clicking, you lot will come across four options popping upwardly. The selection "Shapes" should be at the acme of all others.
Just click on it and y'all volition notice different shapes that you tin can add together to the slides. If you desire, you tin besides add dissimilar types of arrows, different callouts, and various equation syntax. The whole process is pretty simple and easy.
Pace 3 – Create the shape on the slide
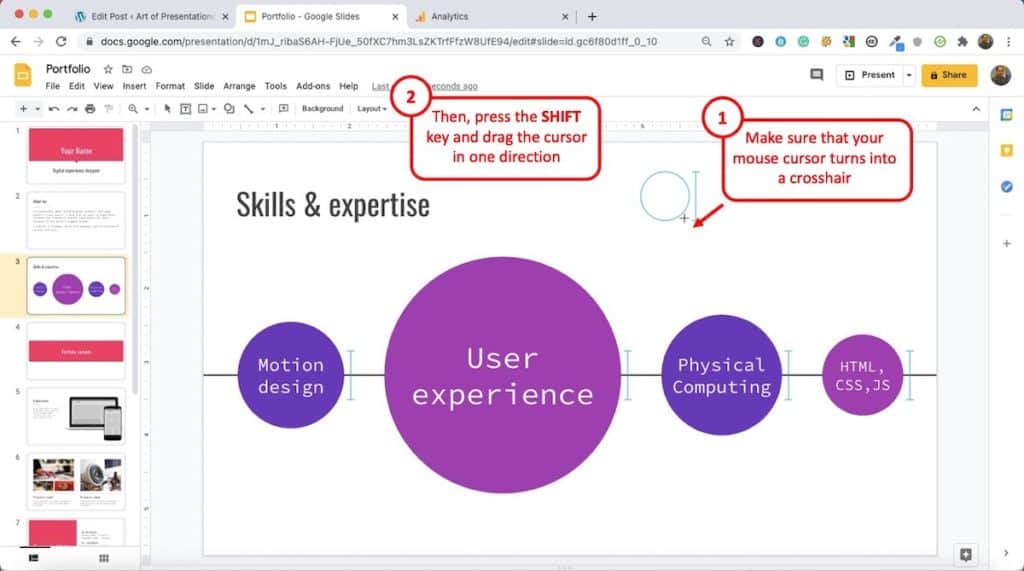
If you need a perfect circumvolve or rectangular, then but select one of those shapes. You will notice that your mouse cursor turns into a crosshair or a plus sign.
Then, while holding the "Shift" key, click and hold on the left mouse push button and drag it as much as you need.
By holding the shift central, you will notice the shape maintains its aspect ratio. This means yous will become a perfect circle or a perfect square while inserting the shape on the slide.
How to Resize Shapes in Google Slides?
Once y'all've understood how to add a shape on Google Slides, resizing it is quite similar. That said, knowing how to resize a shape is quite important.
Here's how to resize a shape in Google Slides –
- Select the shape past clicking on it.
- A blue edge with dots around the shape will announced.
- Motion your cursor over the bluish border.
- So, click and drag the mouse in whatsoever direction to resize the shape.
Hither's a pictorial description of the above mentioned steps –
Pace 1 – Select the shape
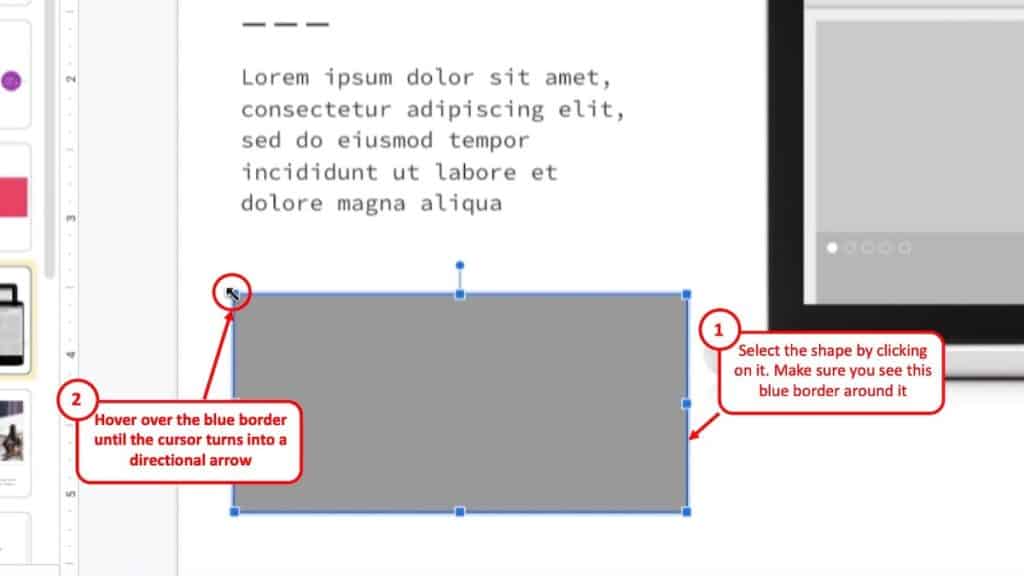
Kickoff of all, click on the shape to select that you want to resize. Y'all will see a bluish line at the border around the shape.
Movement your cursor over the blue border around the shape. Yous will notice that the cursor turns into a directional pointer equally shown in the epitome above.
Step 2 – Drag the shape resize it
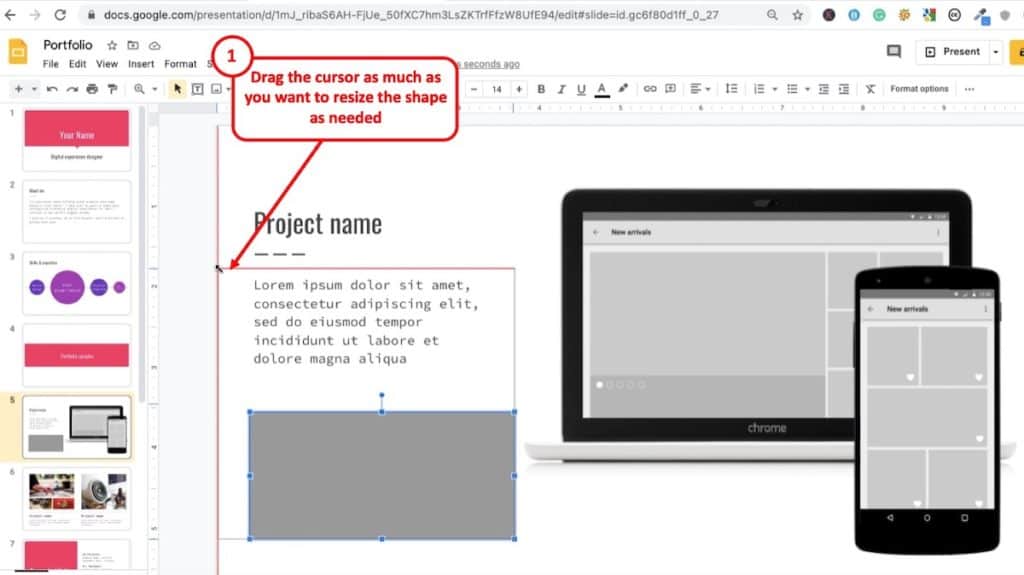
Click and drag the shape in the management you lot want to resize information technology (as shown in the image in a higher place)
You tin resize the shape in all directions. For changing it sideways, click and drag on the eye dot. For changing it from an bending, click and drag on the corner dot.
How to Rotate a Shape in Google Slides?
Apart from resizing the shape, you can even alter the angle of any shape in Google slides. The steps are somewhat similar to resizing the shape.
Here's how to rotate a shape in Google Slides –
Stride i – Select the shape
Select the shape past clicking on it. Now, y'all might run into a dot at the top of the shape followed by a line.
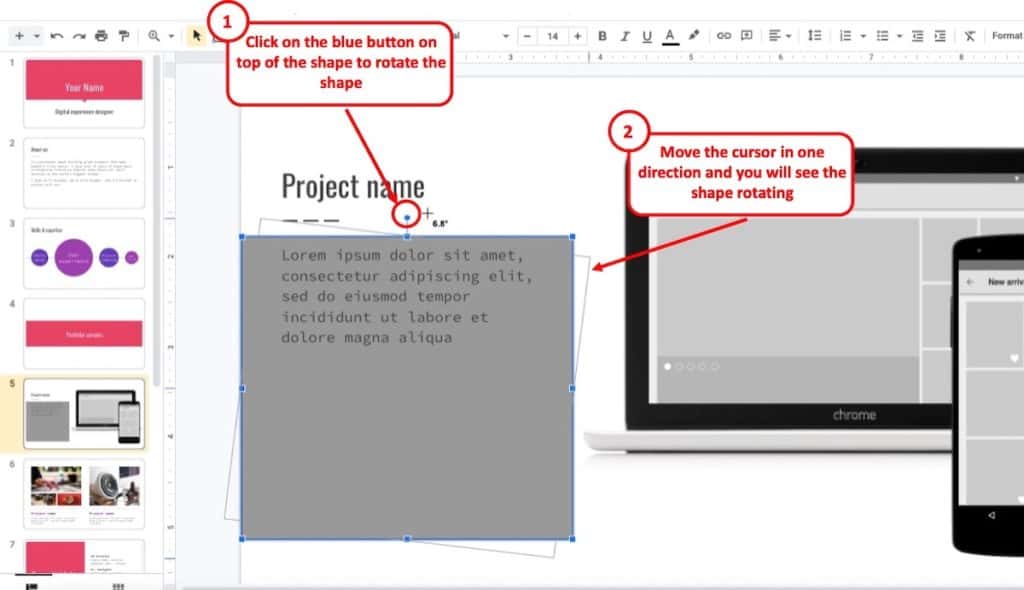
Pace 2 – Rotate the shape
Click and hold on the dot and rotate your mouse and adjust the angle as yous wish. You lot will see a popup text near the shape and information technology will change as you motion your mouse (every bit indicated in the image to a higher place).
You tin rotate the shape in different directions.
How to Format Shapes in Google Slides?
In that location are several different ways you can change the way your shape looks. For example – y'all can modify the color, you can change the border size or border color. You can even add transparency or a shadow to a shape and much more than.
So, permit'south become through diverse options presented by Google Slide nether the format shape settings.
How to Fill a Shape with Colour on Google Slides
Adding color tin exist crucial for making a point valid in your presentation.
For example, if y'all are recommending something, yous might want to put the color "dark-green" in the shape, and you tin put red otherwise.
Footstep 1 – Select the Shape
For adding a colour, offset, yous have to left-click on the shape. Again, a blue line will appear at the border of it.
Pace 2 – Click on the Colour Option
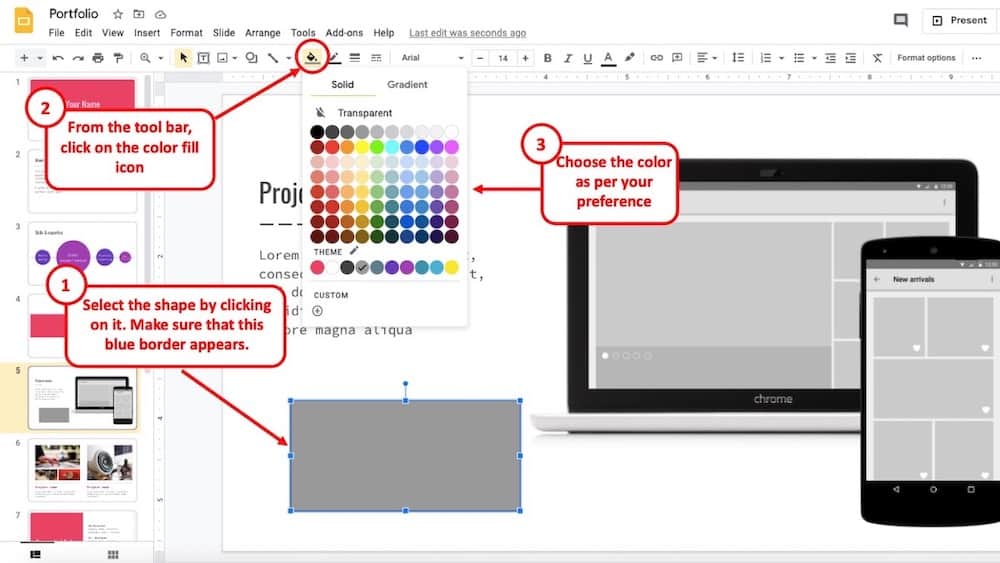
Subsequently clicking, become to the toolbar. Yous should come across a small icon to fill colour. Only click on it and you will detect various colour options that you can utilize on the shape.
There are solid and gradient colors available for you to directly use. But you can also tweak and make a particular color yourself.
Pace 3 – Using non-standard color options
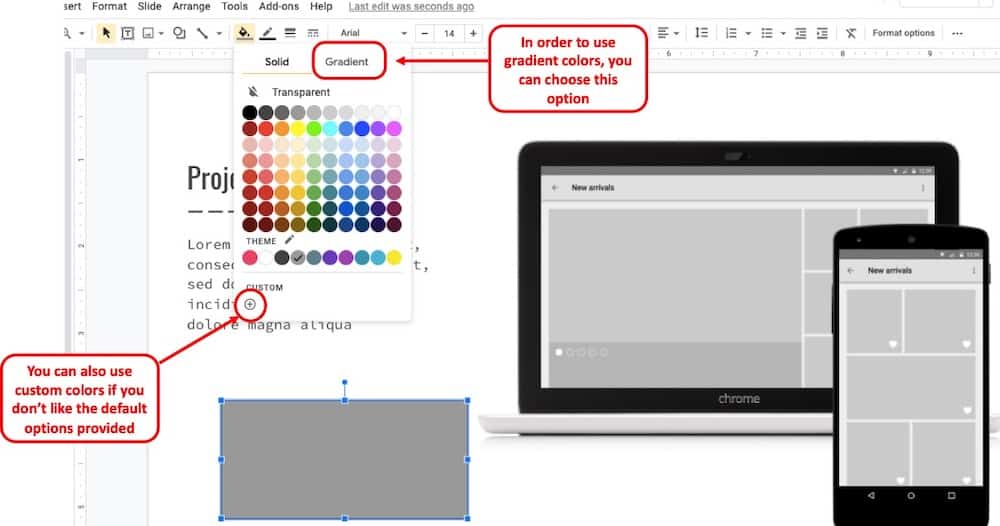
In the "Fill up colour" choice, you volition find a section called "custom". This user-controlled pick has a rounded plus sign.
Click on information technology and a new pop-upwards volition open with options to choose colors from. On this window, you can tweak the color as you like.
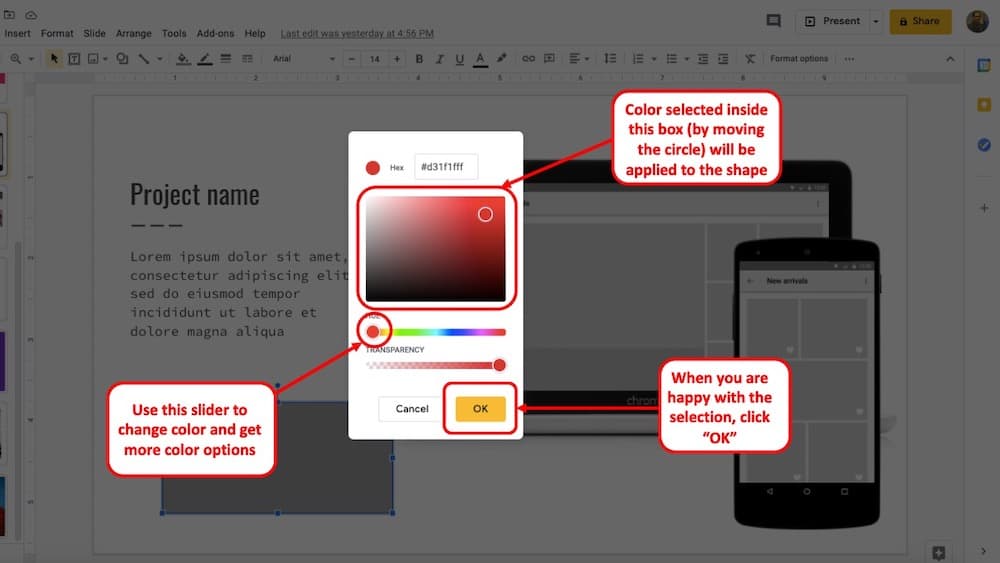
The offset box on the acme indicates the final color that will be displayed on your shape in Google Slides.
Nonetheless, you can change the colors in this superlative box past moving the sliders down below. Moving the "Hue" slider below will modify the colour options totally and allow yous to choose a unlike color in the box above.
Moving the transparency slider will, equally the proper noun suggests, add transparency to the color chosen.
How to Alter the Colour of the Shape Border
Some other thing that you may want to understand is that the colour of the border is different from the colour of the shape itself. This means, a border of a shape can take a different color from the shape itself. Thus, there are different options to cull the colour of the shape border.
Here's how to modify the border of the shape –
- Select the shape by clicking on it.
- Cull the "edge color" pick from the toolbar.
- Click on the color of your option from the dropdown.
Changing the border color is similar to how you would alter the colour of the shape. However, lets expect at the steps in detail below –
Step 1 – Select the shape
Click on the shape to select information technology and to enable the color options. As mentioned above, yous will see a blue colour border around the shape. When you lot run into this, y'all know that the shape is selected.
Step 2 – Click on the Border Color option
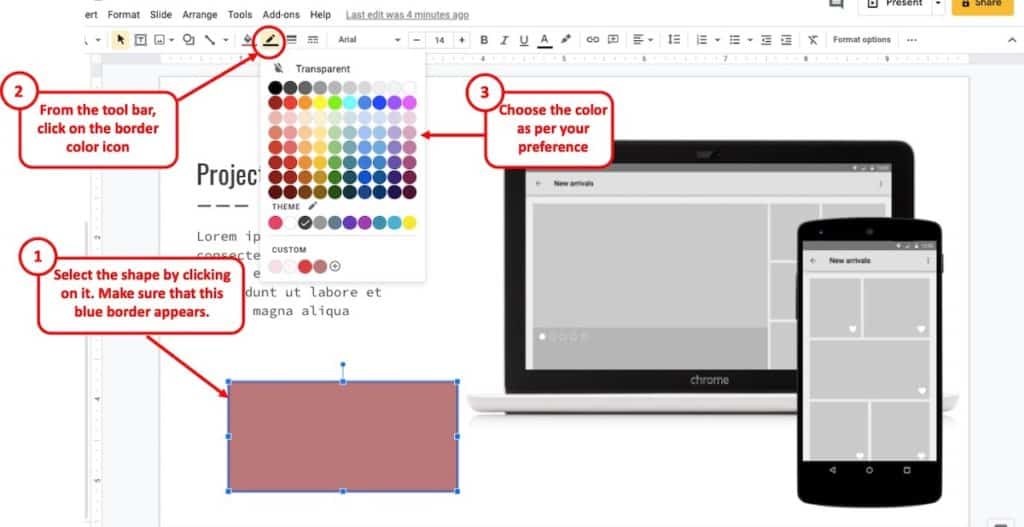
Once the shape is selected, click on the "Edge Color" option in the tool bar on the top. You will see this right next to the color fill option (as indicated in the paradigm above).
When you click on the icon, a dropdown carte will appear with a lot of different color options to choose from.
Footstep 3 – Choose the Shape Outline Colour
Adjacent, when you see the color options provided, click on the color of your choice and you will detect that the color of shape border changes.
Changing the Shape Border Width and Nuance Type
When you modify the color of the shape outline, you may or may not fifty-fifty discover the change in color. That is probably because the thickness of your shape outline is very little.
Google Slides also provides you with an choice to conform the thickness of the shape border or otherwise known equally the "Border Width". You can also change the blazon of line (otherwise known every bit the "Dash Type") for the shape border.
Let'southward look at how to adjust the border width and dash type of a shape in Google Slides –
Irresolute the Shape Border Width –
If you wish to change the width of the border for a particular shape in Google Slides, you lot need to follow the below mentioned steps –
Pace i – Select the Shape
First, make sure you take selected the shape before going through the below steps. You will meet the border width icon just when you have selected the shape.
To select the shape, simply click on it. You lot'll come across a bluish border around the shape. This means, that the shape is selected.
Step 2 – Click on the "Border Width" icon
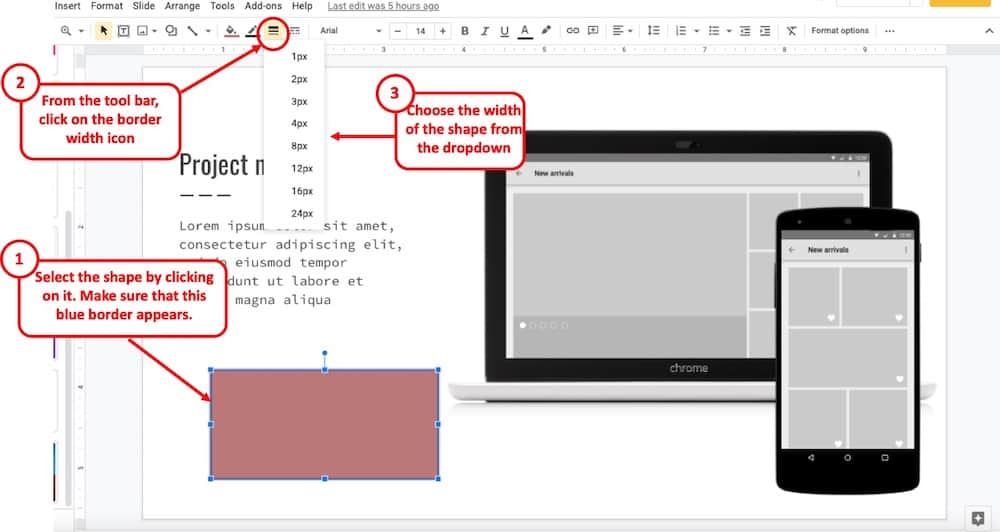
Once the shape is selected, locate the border width icon on the toolbar (as shown in the prototype above). Click on it.
You will be presented with a dropdown with a few different options to increase the width of the shape border.
Click on any one of the options presented in the dropdown. One time you're done, yous will notice that the width or the thickness of the shape outline has increased.
Irresolute the Type of Shape Outline in Google Slides
Apart from increasing the width of the shape outline, you tin can also change the dash type used for the shape border. Allow'due south take a look at how y'all tin change the outline of the shape –
Step i – Select the shape
Equally mentioned to a higher place, you first need to make sure that you lot select the shape. Yous will not be able to come across the option to format the shape outline type without selecting the shape offset.
Step ii – Click on the "Border Dash" icon
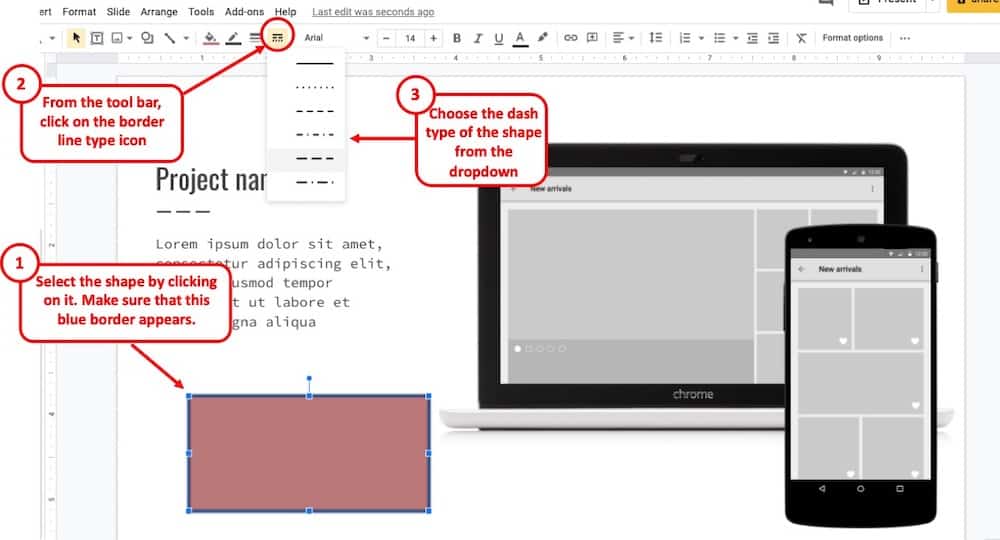
Once you have clicked on the shape to select it, y'all will see an selection to alter the "edge nuance" blazon on the toolbar (every bit indicated in the image above).
Click on it. You volition so exist presented with a dropdown with a few different edge dash types. Select the option based on your preference. You lot'll now observe that the border blazon around your shape has changed.
Add Shape Transparency in Google Slides
Now, at that place are times when yous want to add together a shape to your slide just y'all want to make information technology transparent. This could exist to highlight something on an image or perhaps some part of the slide. So, permit'southward empathise how we can do that.
Hither's how you can add transparency to a shape in Google Slides –
Stride 1 – Select the shape
As usual, the outset thing that we need to do is select the shape. To practise that, simply click on the shape. Yous will observe a blue-colored border around the shape.
Step 2 – Click on the Fill Colour Icon
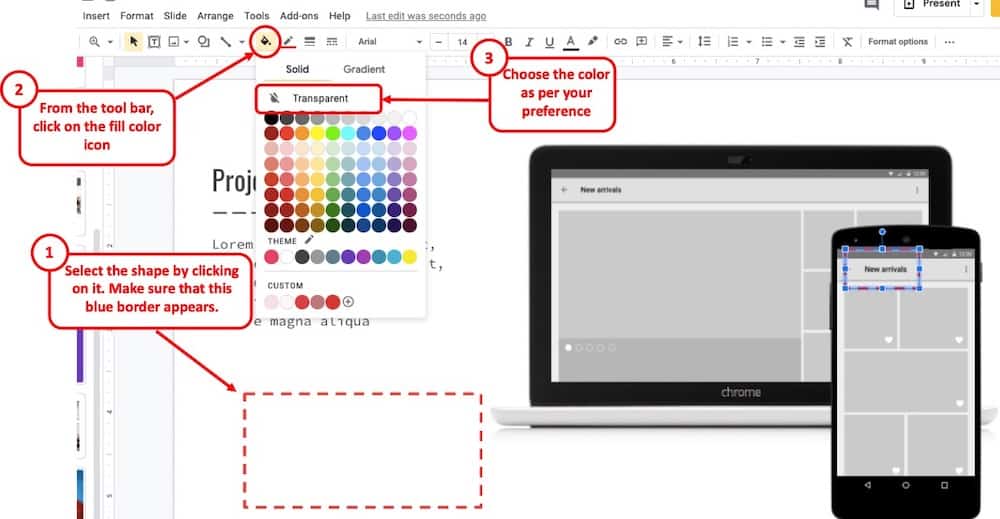
Next, click on the "Fill up color" option from the toolbar. You volition notice a dropdown bill of fare that appears with a few different color options.
However, we will not be choosing any of the colors this time around.
Step 3 – Brand the Shape Transparent
In gild to make the shape transparent, simply click on the "Transparent" option above all the colors presented in the dropdown bill of fare.
Make sure that the shape has some edge that is not transparent. Otherwise, you will not be able to run across the shape at all fifty-fifty though information technology is nowadays on the slide. Yous can choose whatever color for the shape outline as described higher up.
Add Shadow of a Shape in Google Slides
The Shadow issue on a shape can make it look much more than professional person and neater. Adding the shadow result is very simple and straightforward.
Step 1 – Select the Shape
First, click on the intended shape or the paradigm. Make certain it is properly selected. You lot'll see a bluish border around the shape.
Step ii – Click on Format Options
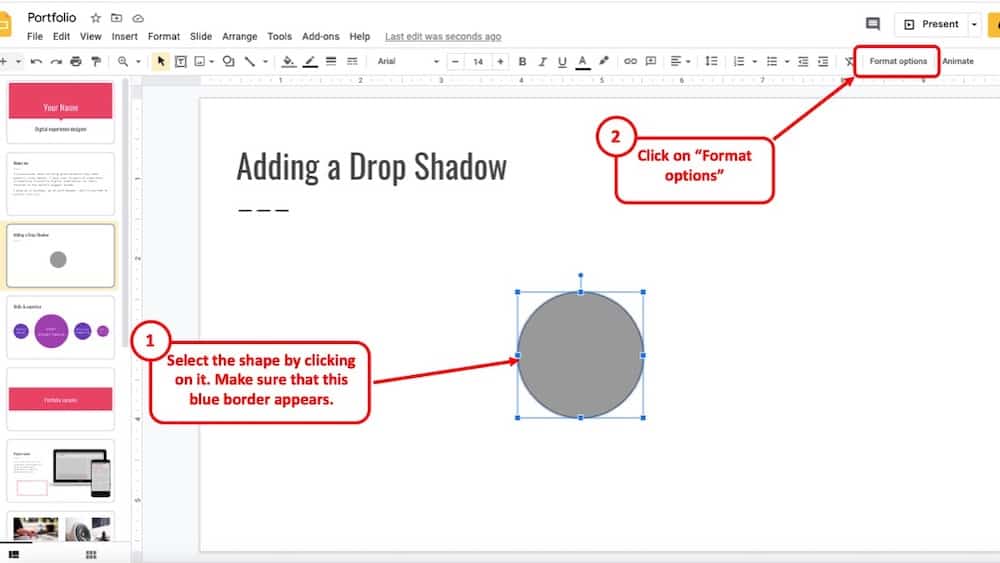
Click on the "format options" on the top right corner of your window (as indicated in the prototype above).
Step three – Add together Drib Shadow from the Format Options window
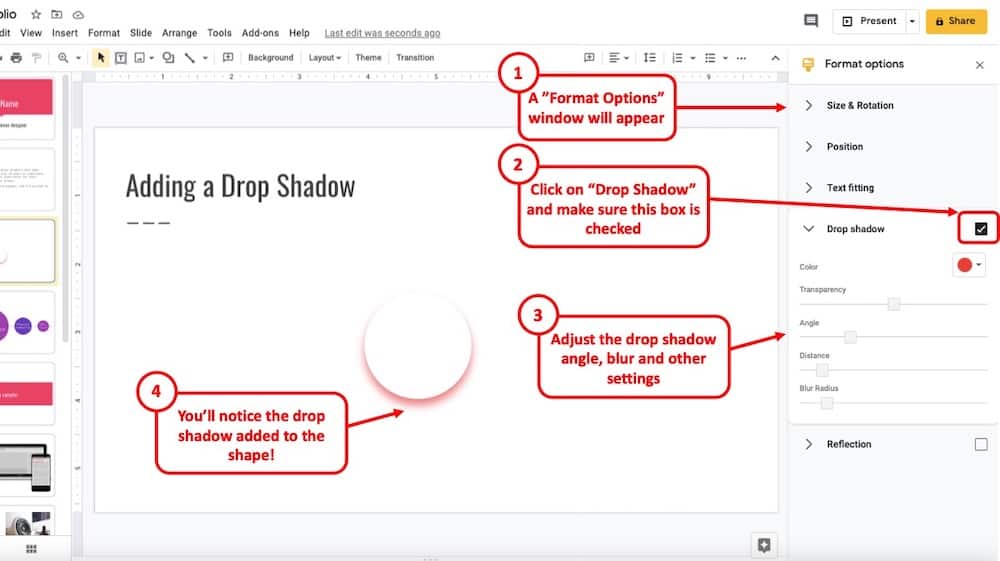
When you click on the "Format Options" button, you will find a new window pop-upwards on the right side of your screen with several different options to choose from.
Click on "Drop Shadow". Make sure the check box is checked.
You can likewise conform the angle, radius, and length of the drop shadow as per your preference. Upon changing the settings, yous will discover that the drop shadow has been added to the shape.
How to Lock Aspect Ratio of a Shape in Google Slides
When working with shapes or images, information technology is important to know how to lock the attribute ratio as information technology can help yous avert distorting a shape or even an image.
Here are the detailed steps if you desire to lock the aspect ratio of a shape or an image in Google Slides –
Step 1 – Click on the Format Card
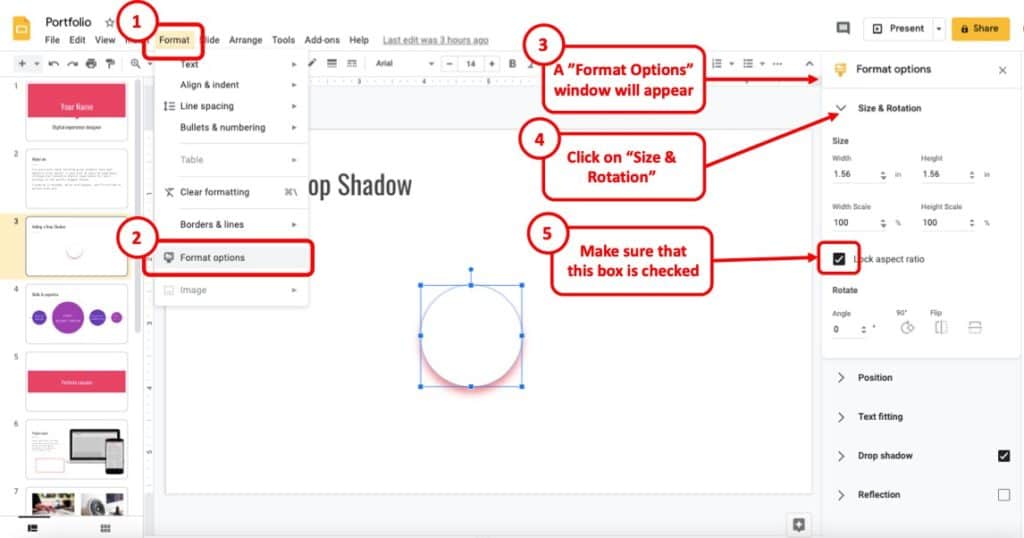
Starting time, brand sure that the shape is selected. To do that, but click on the shape until you see a blue border around a shape (equally shown in the above paradigm).
Then, click on the 'Format' carte du jour from the menu bar. A dropdown menu will appear. Click on the "format options".
Step 2 – Lock the Attribute Ratio from Format Options
You will notice a new window will appear on the right side of your screen. Click on the "Size and rotation" option which should be right at the top of the new screen.
Just check the "Lock Aspect Ratio" option and y'all can change the size of whatsoever image or shapes without reducing the visual quality.
How to Provide Reflection Issue to a Shape
A reflection effect can brand an paradigm or shape look much more professional. Once again, calculation a reflection effect is very straightforward.
Step one
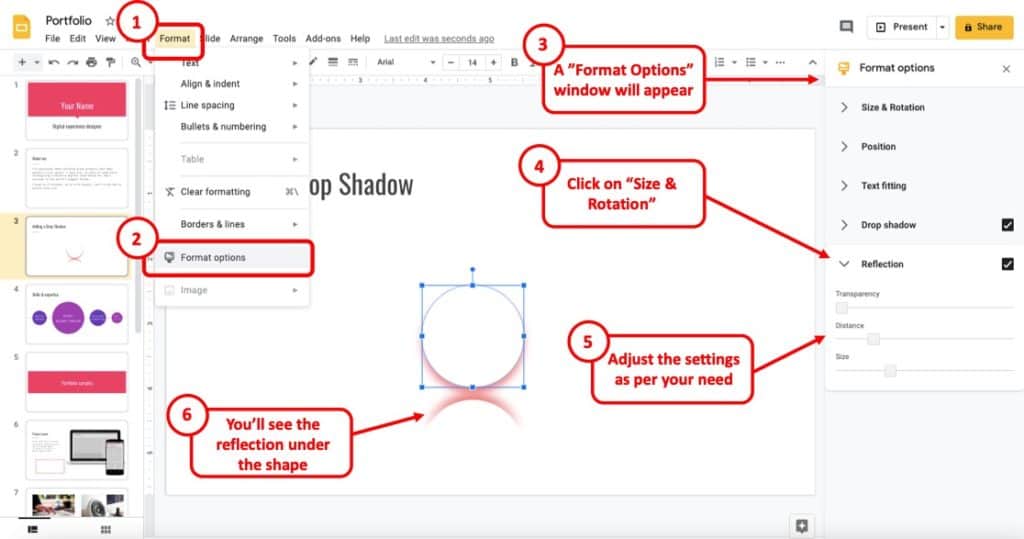
To insert the option, tap the 'Format' button from the bill of fare bar every bit shown in the image above.
A drop-down bill of fare volition brandish. For seeing the reflection pick, click on the "Format option" and you will see a new window popular up.
Step 2
The "Reflection" option is correct at the lesser of that new popular-upward screen. But click on information technology and the reflection upshot will be added.
Y'all can even customize the effect every bit you similar. You can alter the transparency of the reflected shape, alter the distance between the actual shape and the reflected shape, and you tin as well alter the size of the reflection.
Calculation Text to a Shape in Google Slides
Calculation texts inside a shape is a key necessity for making it meaningful. The steps are given below.
Step 1 – Adding Text to a Shape
Firstly, select the shape. And so, right-click on the shape for adding text within a shape.
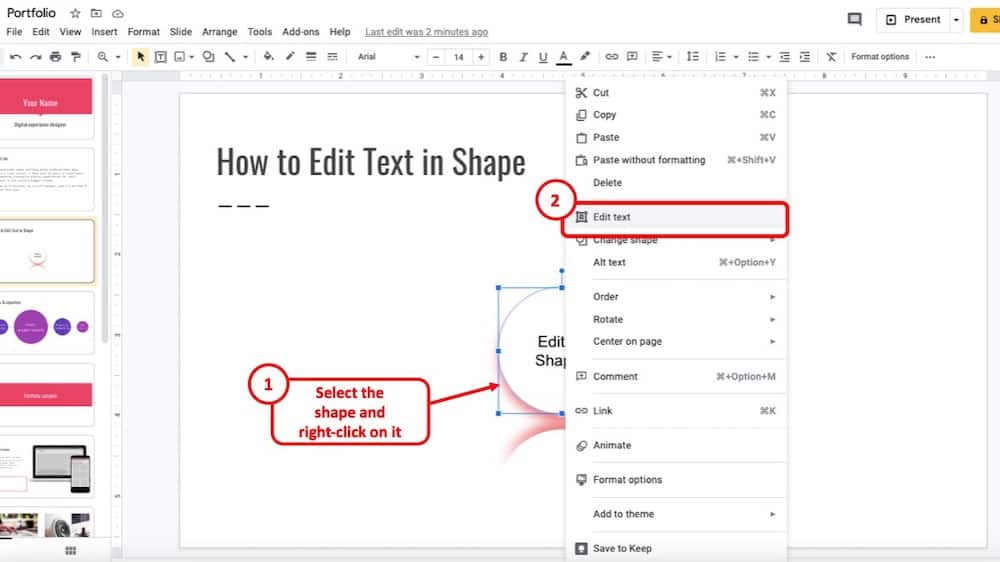
A menu will popular-up. Simply select "Edit Text" option from the pop-upward menu.
You volition now notice that you are able to type inside the shape.
Footstep 2 (Customizing the Text)
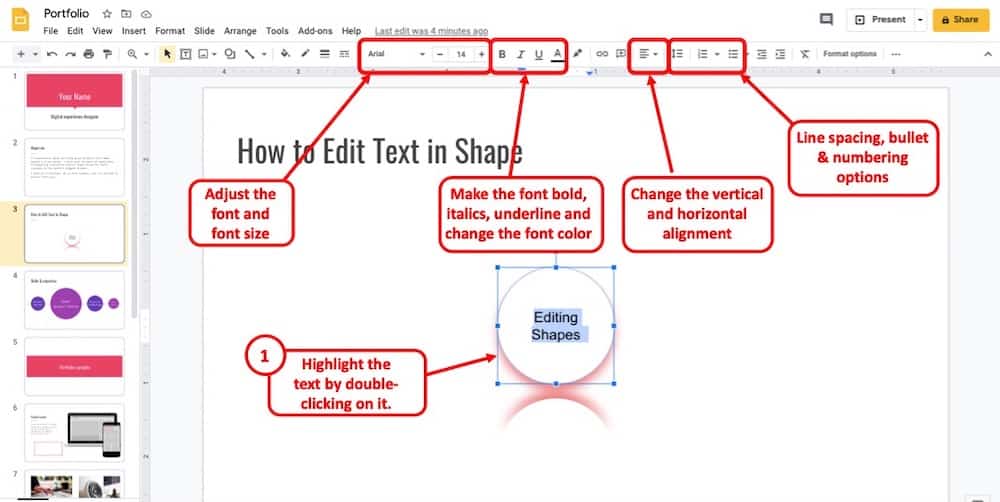
There are various ways to customize the text inside a shape. First, make sure that yous highlight the text inside the shape to begin the process of customizing it.
And then, you can adjust the font blazon, font size, make the text bold, italics, underline or even change the color of the font using the various options available in the toolbar (as shown in the image above).
Furthermore, you tin as well alter the alignment of the text within the shape, along with calculation bullets and numbering and vertical spacing.
How to Put a Picture in a Shape in Google Slides
One of the coolest things that yous tin practice in Google Slides is put a picture within a shape!
On the face of it, this may audio quite plain and unproblematic, but when used creatively, this characteristic tin make your slide actually stand out!
So, let's learn how to put a picture in a shape in Google Slides –
Step 1 – Insert an Image
You don't accept to have an prototype on your computer to insert images. Here are the steps to insert an image –
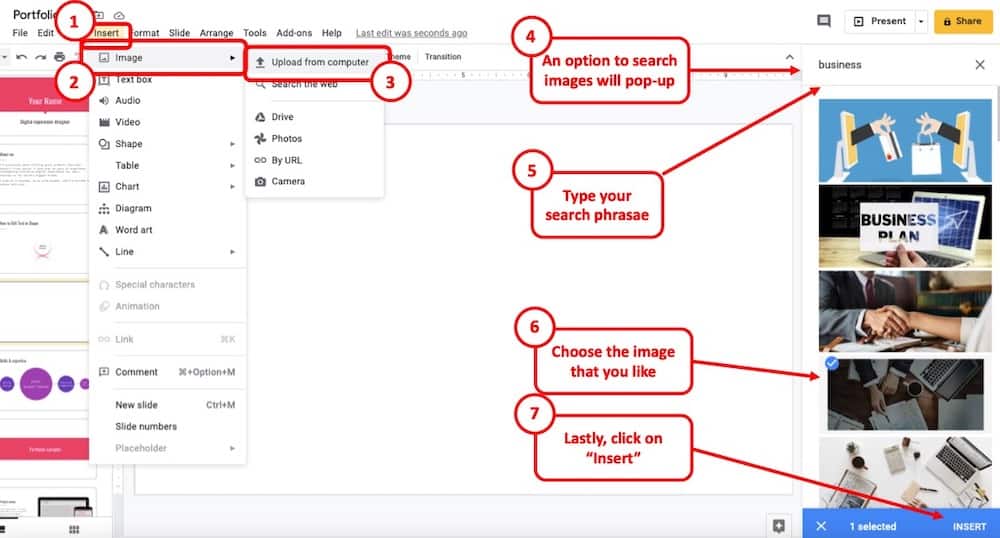
First of all, become to the "Insert" option in the menu bar. So, from the dropdown, click on "Image". Then, click on "Search the Web".
You tin can straight search and add an epitome to your presentation by searching the topic for your image then selecting and inserting the image that you like.
Pace 2 – Put the Picture in a Shape
Subsequently inserting the image, you can give it any shape that you prefer. For doing that, follow the steps provided below.
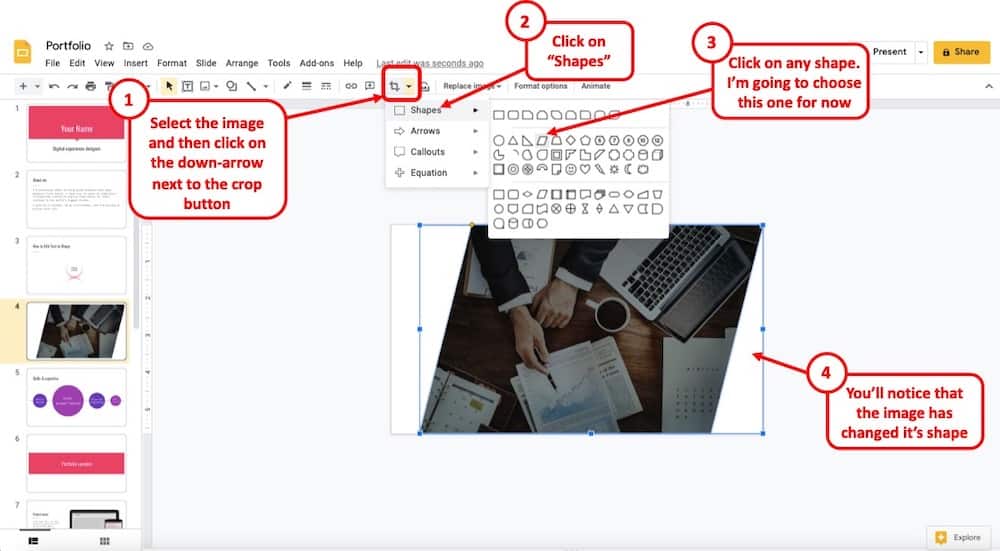
Click on the prototype that you lot desire to convert to a shape. On the toolbar, you will meet an pick named "ingather image".
The crop image icon will too have a small downwards-facing pointer. Click on it. Y'all volition see several options to mask an epitome into a shape.
Click on whatsoever shape of your choice. For the purpose of this example, I decided to become with a parallelogram.
Step 3 – Finishing Touches

In one case, you've put the epitome in a shape, move information technology effectually and adjust information technology as per convenience. Add some text and you can very well create a visually highly-seasoned slide quite quickly!
How to Make Freeform Shapes in Google Slides
There are more 120 shapes bachelor in Google Slides for you lot to use in your presentation. But in some cases, the shape you are looking for might not be available and you might have to create that particular shape yourself. Fortunately, creating custom shapes on Google Slide is very like shooting fish in a barrel and straightforward.
There are two ways that y'all can utilize to make a custom shape. You lot can merge different shapes available in the app for making a new one, or y'all can depict one yourself. In near cases, merging shapes work best as drawing a new one is a bit complicated and time-consuming.
Merging Shapes in Google Slide
Step one
For merging different shapes, just add a few of them like I take explained before. Then, put some appropriate color onto them and put them in a logical order.
Step two
After doing all of that, select all the shapes at the same time and get to arrange. You will find it at the correct-top corner of the screen.
So click on the group option. Now, y'all can alter the bending, size, and colour of that merged shape at the same time. Observe how I made an water ice foam cone past following this method.
Creating a Custom Shape Using Lines
If the previous method is non fulfilling your need, then y'all can draw a custom shape yourself. For Doing that, follow the steps provided below.
Step i
Click on the "Select line" pick which is situated at the tiptop left corner of the screen, just beside the "Shape" option. You will see a drop-down menu popping up which has various drawing options.
Step 2
Using the "Select line" selection, you can make well-nigh whatsoever shape you need. Information technology might accept a chip more time and patience.
Just if you lot go on on trying, this could be an even meliorate method for you to make custom shapes.
Observe how I made a random shape using the "curve" option from that drib-down menu.
For making a professional presentation, knowing how to brand custom shapes is a must. There will be times when yous will demand shapes that are not available on Google Slide.
But, making them on this platform is very simple and piece of cake.
Some Of import Tips on Using Shapes in Google Slides
For making a professional looking presentation, you must use some other features provided by Google Slides. Some of those features are given below.
How to Arrange Various Shapes
Arranging shapes after creating them is a crucial part of making presentations. You can hands adjust them by clicking on the "adapt" button which is at the top-middle corner of the screen. Subsequently clicking, yous volition see a drop-downwardly card. Using that menu, you tin easily arrange various aspects of that shape.
Aligning a Shape
If you need to adjust the alignment of that shape with a dissimilar one, just use the "Align" parameter of the previously discussed drib-downwardly menu. You tin can as well move the shape equally you need for making a neat presentation. For case, if you need a shape right in the center of the slide, just utilize the "Center on page" choice. This feature is particularly useful when yous are using many shapes on a single page.
Rotating a Shape
In your presentation, you might need to rotate a shape for making it look more than professional. For a free class rotation, left-click on the shape and click and agree on the small circle which is placed right at the top of it.
But if yous demand a quick 90-caste move, merely correct click on a shape and become to the rotate choice. Y'all can rotate the shape both clockwise and anti-clockwise. Using this option will speed up your presentation making procedure.
Flipping a Shape
Yous might also need to flip a particular shape while making a presentation. Again, just right-click on information technology and you will see the flipping option on the "rotate" section. You can flip it on both horizontally and vertically. If there is a text inside the shape, information technology won't modify in horizontal flip. Just the letters will also flip when you will use the vertical flip option.
Changing the Order of a Shape
If you are using more than one shape in a single slide, then you might need to order them correctly. For example, if you need a shape in front of another ane, then you can easily exercise it by using the "Order" option. Using this feature, you can perfectly merge diverse shapes into a particular shape.
Concluding Thoughts
As yous can run into, adding shapes and formatting them in Google Slides is a piece of cake. In this commodity, I have vastly discussed how to format shapes in Google slides. Hopefully, you volition be able to perfectly format the shapes of your presentation after reading through the whole commodity. Until adjacent time, good day.

Source: https://artofpresentations.com/how-to-format-shapes-in-google-slides/
Posted by: spraguewithery.blogspot.com
0 Response to "How To Insert A Drawing In Google Slides"
Post a Comment